Happily Budgeting Series: Shopping Apps that Save You Money

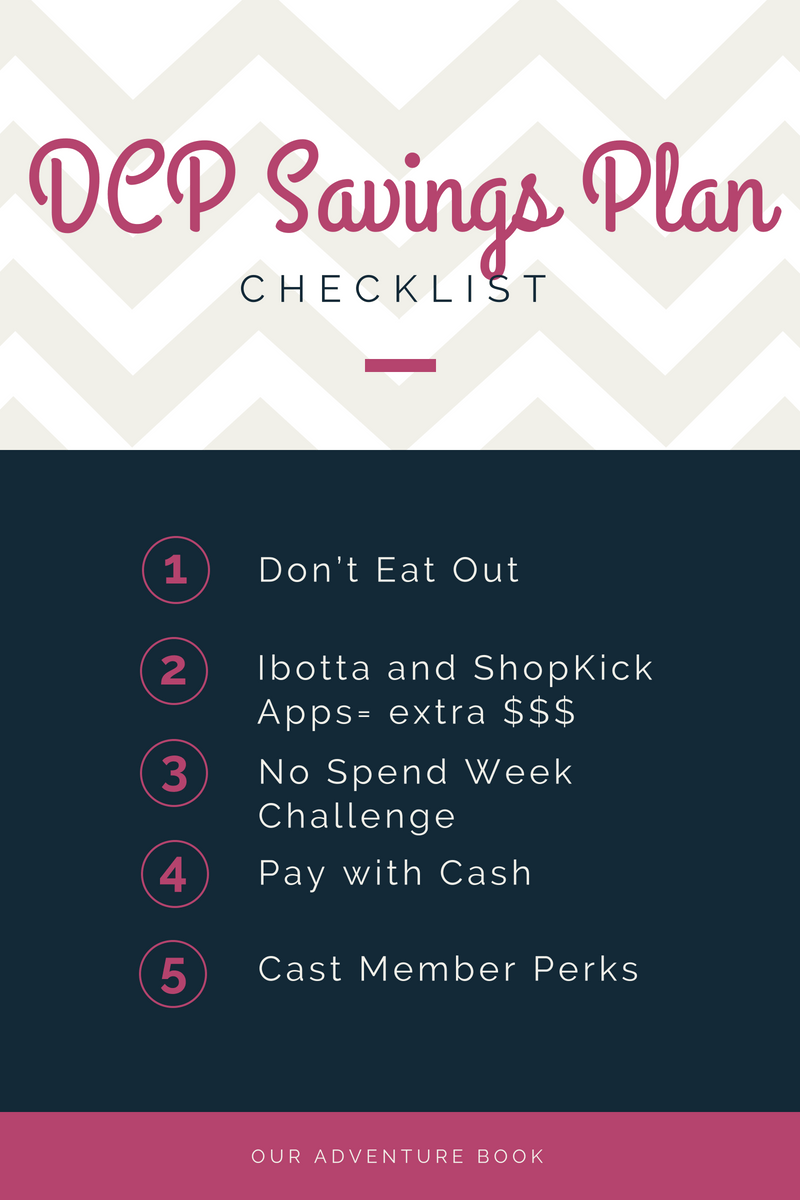
This is the first post in my “Happily Budgeting Series”. There was such a great response to my Disney College Program Series: How to Save Money on the DCP post that I thought I would create a whole series about saving money. I’m calling it “Happily Budgeting” because I think it is absolutely possible to be happy while staying on a budget. So often that word BUDGET gets a bad wrap. It makes you think you have to do without anything fun or enjoyable or positive in any way.

But I submit, and will hopefully prove in every edition of this series, that you can be happy, have fun AND budget! Today, we’re going to talk about Shopping Apps that Save You Money!
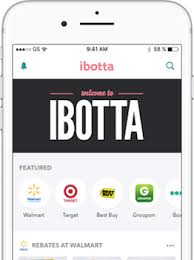
#1- Ibotta app

If you haven’t tried this app, you need to! You’re already going to be buying groceries, so why not make a little extra? You get “cash back” for certain purchases (verified with a receipt you scan into the app) as well as for completing certain challenges within the app. Then you can redeem your cash back via Venmo (this is my new favorite method because it’s actually cash right into my bank account) or various gift cards. You can also get bonus cash back by inviting your friends to join in the savings fun. I’ve earned almost $300 by using this app!

You can use Ibotta to earn cash back not only in stores, but also while shopping online at Amazon, Apple, Hotels.com and MANY others!

 ***Join by following this link https://ibotta.com/r/hskqwnc or download the app and put in my referral code hskqwnc. The app is available for android and iOS users. By following my referral link or using my code, you’ll get a $10 bonus when you redeem your first offer!***

#2- Shopkick app
I don’t find this one to be as lucrative as Ibotta, but it’s good for an extra $25-50. And that could cover a meal or souvenir at Disney! Shopkick is still evolving and you can use it similarly to Ibotta or you can use your phone and scan items in the store to earn “kicks”. The nice thing about Shopkick is that you can redeem your kicks for a Disney Gift Card! You’ll get an email with a digital code that you can use to pay for your trip or to pay for things on your vacation. Invite Friends and you each earn 250 kicks!

Today I went to Target to grocery shop and I earned 340 Kicks just from scanning items on the list! I earned an extra 175 when I bought Rice Krispies. And just like Ibotta, you can earn by shopping in stores or online! Be sure and take a look at all of the ways you can earn your way to gift cards!

***Try Shopkick and we’ll both get points toward a free gift card! 😀 Use code GIFT503676 or download http://getsk.co/gift503676

#3- Cartwheel by Target
This is part of the Target app. You can look at the App, but you can also search through specific products you can save on. Just add the products to your Cartwheel and then make sure to scan your Cartwheel barcode at checkout! Over the course of a few years, I’ve saved quite a bit just by checking to see if any items I need are on the cartwheel app.

#4- Specific Store Apps
Many stores have their own apps, like Target, that help you save money. Publix, Smiths, Kroger, Michaels, JoAnns…the list goes on. They all offer special coupons and sometimes freebies through their app! Find the ones you visit most!

I love to see my savings growing every time I use the apps! These apps really do make budgeting fun for me. On my single trip to Target today, I saved/earned over $10. In less than an hour. And I still got everything that I needed, I just paid a little bit less. And every little bit adds up!

Does anyone else have a money saving app that they love? I’m always looking for new ones to try! Leave a Comment!

Disney College Program Series: How to Save Money on the DCP

Let’s just say it now, being an adult is ROUGH! You work and you work and you work and you get a tiny paycheck and you just want to have a little fun, but fun requires money and you’ve got bills to pay! The Disney College Program is great because it’s a paid internship opportunity, however, it’s not going to pay you loads and there are so many fun things to do in Orlando that cost money. So what are you going to do?

This blog post is going to tell you some of our tips for saving money and being generally thrifty while on you Disney College Program. Honestly, we use most of these tips all of the time, but we went especially hardcore with these techniques when we started our Disney College Program.

BEFORE YOU START SAVING- Figure out your budget. Play around with a spreadsheet and figure out how much you’ll make each week. Don’t forget to also keep track of all of the expenses too. Have a list of your rent, car payment, insurance, etc. To a certain extent, you can control what you make. Pick up extra shifts if you need extra money. Over Time is your best friend! And sometimes you have to work more now so you can play later!

On to the savings tips…

FIRST TIP- We decided we wouldn’t eat out and would grocery shop and cook at home. Fortunately, I am a pretty good cook. But you don’t have to be. Have you heard of Pinterest? Follow me on Pinterest to find some easy recipes that are great for meal planning on a budget! And you know what, we eat A LOT of peanut butter sandwiches. This way, we take our lunches and don’t spend money at the cafeterias at work. Sure a meal might only cost $5, but $5 spent everyday, 5 days a week adds up to $25 per week and $100 over the course of a month! Do you know what you could do with $100?!? We saved for a couple of months and bought Universal Studios passes. And that was just from saving money on that one meal.

SECOND TIP- Find extra little ways to make money. Once you know you’re determined to grocery shop, there are a couple of apps that will actually make you a little extra money when you use them while shopping! When we had to get set up in the apartment, we earned over $25 using just app #1!!!

#1- Ibotta app– if you haven’t tried this app, you need to! You’re already going to be buying groceries, so why not make a little extra? You get “cash back” for certain purchases (verified with a receipt you scan into the app) as as for completing certain challenges within the app. Then you can redeem your cash back via Venmo (this is my new favorite method because it’s actually cash right into my bank account) or various gift cards. You can also get bonus cash back by inviting your friends to join in the savings fun. I’ve earned almost $300 by using this app!


***Join by following this link https://ibotta.com/r/hskqwnc or download the app and put in my referral code hskqwnc. The app is available for android and iOS users. By following my referral link or using my code, you’ll get a $10 bonus when you redeem your first offer!***
#2- Shopkick app- I don’t find this one to be as lucrative as Ibotta, but it’s good for an extra $25-50. And that could cover a meal or souvenir at Disney! Shopkick is still evolving and you can use it similarly to Ibotta or you can use your phone and scan items in the store to earn “kicks”. The nice thing about Shopkick is that you can redeem your kicks for a Disney Gift Card! You’ll get an email with a digital code that you can use to pay for your trip or to pay for things on your vacation. Invite Friends and you each earn 250 kicks!
***Try Shopkick and we’ll both get points toward a free gift card! 😀 Use code GIFT503676 or download http://getsk.co/gift503676

THIRD TIP- Challenge yourself to a NO SPEND WEEK. My friend and I were really ambitious one year and challenged ourselves to a No Spend Month. A month is a long time and sometimes you’re going to have to spend money. However, a Week is MUCH more doable! We have rules for our No Spend Weeks-

  • No spending on luxury want items- i.e. shoes, dresses, make up, candy
  • We can spend money on Gas
  • We can spend money on necessary items. For us this includes: milk, cheese, bread and eggs.
  • Stay off of Amazon. Online shopping will get you every time. It’s so convenient and amazon has such good prices… Just avoid it.
We’ve discovered that having a sweeping “Don’t spend any money” declaration just doesn’t work. But giving yourself lee-way for the necessities makes it a little easier. Just make sure you stick to it.
FOURTH TIP- Don’t use credit cards. It might be tempting, but if you don’t have the cash to pay for it, don’t buy it! Yes you should have fun on the Disney College Program, but don’t go into debt to do that! 
FIFTH TIP- Part A- Enjoy the FREE things! While on your DCP, you have a lot of free perks offered to you by Disney. You can go to any of the Disney parks for free. Ride the rides. Walk around the shops (Don’t buy anything if it’s a NO SPEND WEEK) even treat yourself to a snack. Which brings me to my last tip…
FIFTH TIP- Part B- Know about the discounts Disney Cast Members Enjoy! Keep track of where you can eat for the best deal. Know what merchandise locations give discounts. Remember that certain times of year Disney Cast Members get even BETTER discounts! Save and plan for those times. 
If you follow our tips, you’ll find you have the money you need for fun, and you’ll be able to save a little too, if you want. We’ve been able to pay all of our bills and save for fun as well! It’s totally doable!!! 

7 Hair Products I Use and Love

This post contains affiliate links. When you follow these links I may receive a commission at no additional cost to you. Thank you!

I have a lot of hair. It’s long and I color it and I straighten it and I curl it and I really do my best to see if it will just give up on me and fall out. Haha. Ok, I’ve also tried a lot of different products to off-set the terrible things I put my hair through. And while I was brushing my hair the other day, I thought, “I should make a blog post about my favorite hair products! I’ve spent a lot of time and energy figuring these things out and other people should not spend so much time (and tears) finding these gems!” So here’s a list of 7 Hair Products I Use and Love!

1. Pureology Hydrate Shampoo and Conditioner

This is hands down my FAVORITE shampoo and conditioner. It smells amazing and I love how it makes my scalp tingle. My hair loves it because it’s paraben free. My hair is so soft when I use this mighty duo. It’s definitely pricier than what I’ve been using while being budget friendly here in the Disney College Program. But you better believe that the minute I don’t have to scrimp and save every penny as an intern, I will be ordering this ASAP. Buy the shampoo and conditioner on Amazon.

2. Garnier Fructis Hair Smoothing 1-minute Mask

Because you can’t always afford hair luxuries, this is one of my favorite budget-friendly hair products. It has seriously saved my hair. I spend a lot of time in the sun and this mask revitalizes my hair every time I use it. I put it on after I shampoo, while I’m shaving or using my body scrub. And then I rinse and BAM- silky, smooth hair! It comes in 2 different sizes and even the bigger size is under $5!!! Get it here

3. Argan oil of Morocco

When I lived in Utah, I had really hard water and it was drying my hair out like crazy! This Argan Oil of Morocco was a life saver! It helped to moisturize and soften my very dry and brittle hair. I definitely would recommend this to anyone wanting healthy and shiny hair like you see in the commercials! Add this item to your amazon order here.

4. It’s a 10 Leave in Conditioner

I have naturally curly hair and often that means my hair gets really tangled when it’s wet, even using conditioner when I wash. A few sprays of this and it’s easy to comb through my hair post-shower. Plus, it has all kinds of other benefits! As per the back of the bottle…

  • Repairs dry damaged hair. Stops hair breakage.
  • Adds shine, smoothes & controls frizz.
  • Creates silkiness
  • Seals & protects hair color .
  • Enhances natural body
  • Detangles, prevents split ends
  • Flat iron and thermal protector

Order yours on Amazon here!
5. Aussie Mousse

I’ve used A LOT of curl products in my life. Like…A LOT!!! And this one is still my favorite. It has a leave-in conditioner, so it leaves my hair feeling soft and even when I wash it, I don’t feel like my hair is coated in crap I’ll never be able to remove. And the best part is that I buy it from Wal-mart for like $3.

6. Hair Protector Spray

Again, I’ve tried a lot of different heat protector Sprays, but TRESemme’s is just the best. My hair always feel smooth and protected after I use it. And I regularly blow dry, flat iron or curl my hair with a curling iron. I’ve been using this one for YEARS. Join the fan club! Pick it up at Target or Wal-Mart.

7. My Hairbrushes

I actually use 2 different hairbrushes. I use the Wet Brush (like this one) when my hair is wet and then I use a Boar Bristle Hairbrush (get it here) when it’s dry. I feel like using these both keep my hair healthy and I have less breakage across the board. I love them both and highly recommend them!

Now I want to know what your favorites are! Leave a comment below with your must-have hair products!

Saving For Your Disney Trip

There’s no denying that any Disney Vacation is expensive. Saving for a Disney Trip is one of the first steps in the planning process. It can take some time to save up for your trip. This post is going to talk about how to save for your Disney trip. I have a lot of thoughts about this so let’s just jump right in!

#1- Start Early

There are a few things you should know about me. First, I am a planner. I really like planning ahead. It’s not often that I just kind of “fly by the seat of my pants”, as it were. Second, I have the travel bug. In my family, we’ve decided it’s a genetic thing. My Grandpa can get home from one trip and immediately start wondering when the next trip will be and lamenting the fact that he “never goes anywhere.” I definitely inherited that. And because of that, we have a special “Travel” savings account that we just continually add to for our next trip, whatever and whenever it might be. Basically, we always know there will be a “next trip”. 

If you’re a Disney trip novice, I recommend starting to plan around a year ahead. This will give you a good amount of time to save up and to keep your eye out for deals, discounts, and promotions. Depending on the time of year, you can get discounts on Disney hotel rooms, packages and even FREE DINING PLANS. A year will give you time to figure out approximately how much you might need to save up for your trip. And to make appropriate reservations (but that’s another post for another time). 

#2- Create a Savings Plan

Once you’ve done your early estimating, figure out how much you need to save and break it down into manageable bites. I like to use spreadsheets. I know, I’m a nerd (also hereditary). Here’s an example of how I would breakdown our savings plan…


#3- Find Extra Ways to Find Extra Funds

Obviously your primary source of income will be the first place you start saving from. But sometimes our budgets are already stretched thin. The more creative you are with your money saving, the quicker you’ll be able to save! I have a few suggestions, in addition to having a designated savings account. 

#1- Ibotta app– if you haven’t tried this app, you need to! You’re already going to be buying groceries, so why not make a little extra? You get “cash back” for certain purchases (verified with a receipt you scan into the app) as as for completing certain challenges within the app. Then you can redeem your cash back via Venmo (this is my new favorite method because it’s actually cash right into my bank account) or various gift cards. You can also get bonus cash back by inviting your friends to join in the savings fun. I’ve earned almost $300 by using this app!

***Join by following this link https://ibotta.com/r/hskqwnc or download the app and put in my referral code hskqwnc. The app is available for android and iOS users. By following my referral link or using my code, you’ll get a $10 bonus when you redeem your first offer!***
#2- Shopkick app- I don’t find this one to be as lucrative as Ibotta, but it’s good for an extra $25-50. And that could cover a meal or souvenir at Disney! Shopkick is still evolving and you can use it similarly to Ibotta or you can use your phone and scan items in the store to earn “kicks”. The nice thing about Shopkick is that you can redeem your kicks for a Disney Gift Card! You’ll get an email with a digital code that you can use to pay for your trip or to pay for things on your vacation. Invite Friends and you each earn 250 kicks!
***Try Shopkick and we’ll both get points toward a free gift card! 😀 Use code GIFT503676 or download http://getsk.co/gift503676

#3- Change jar- We have a jar that we keep on our dresser and every time one of us gets change, we put it in the jar. We also stick our gift cards in the jar and occasionally we add in cash we get for gifts or we just take out a little extra in cash and put it in the jar. And then when we get close to the vacation, we take out the coins and see what we have. It definitely adds up.

#4- Garage/Yard Sale- Everyone has extra stuff laying around that we don’t really use or need to keep. Sell it! With social media, you can even just post your items online to see if your friends or friends-friends have been looking for those things for their lives. You’ll clean out your house and add to your fund!

#5- Don’t Treat Yo Self- This might be one of the only times I say this (haha). But your Disney trip will be the ultimate Treat Yo Self, so you can do without for a few months as you save. Take the money from your Treat Yo Self days and put them in your Travel account.

Insider Tips for Conquering Hollywood Studios Park

Hollywood Studios has kind of been overlooked for the last few years as it’s been going through big changes. With the opening of Toy Story Land just recently and the expected opening of several other new attractions, including Star Wars Galaxy’s Edge, Hollywood Studios is about to become a much busier park.

In this post, you’re going to get a few tips to help your visit to Hollywood Studios be more comfortable and enjoyable for everyone! They’re in no particular order, just kind of as they popped into my brain!

1. Don’t take photos at the Mickey and Brooms topiary first thing in the morning. You’ll thank me later. The morning might seem like a great time to take photos because everyone is still happy and not sweaty. But for the Mickey Topiary, morning is just not ideal. The sun will be RIGHT IN YOUR EYES! Even if it’s cloudy, you’ll still be squinting with the brightness. Do your whole family a favor and get that photo in the afternoon/early evening.

2. Get to the park for rope drop/opening. With Toy Story Land being BRAND NEW, the crowds are just really crazy. There is currently not a single-rider line for Slinky Dog coaster and it’s wildly popular. Get to the park at least 20 minutes before it’s scheduled to open as sometimes the park will open early. I’ve heard from multiple guests that if you get in right when it opens, you’ll be able to ride all of the rides, multiple times in some cases.

3. If you’re not an early morning person, you need to stay at a Disney Resort hotel and book your FastPasses 60 days in advance. You’ll still only be able to book one (1) FastPass for a Toy Story ride. I would suggest Slinky Dog as your FastPass ride. That line seems to be the longest. If you’re going to be able to visit Hollywood Studios on more than one day, you can get a FastPass for a different Toy Story ride for that other day.

4. Be aware that there is not a ton of shade, especially in Toy Story Land. Come prepared to hydrate and stay cool. Have your cooling towels and water bottles ready. Wear hats. Plan to see some of the shows throughout the day so you have sit-down and cool-down time.

5. Know which eating locations have indoor seating. Of course the Table Service restaurants will have indoor seating with beautiful Air Conditioning. But those are not your only options. Backlot Express will have some limited indoor seating, but they also have outdoor seating. Backlot Express can be found over by Star Tours. ABC Commissary has quite a bit of indoor seating and is located behind the Hyperion Theater (where the Frozen Sing-a-long shows).

6. The First Order marches every hour on the hour (except for 1:00 pm). So if you have a Star Wars crazed kid, you’ll have ample opportunities. It is pretty cool and lasts around 10-15 minutes so you can catch it and move on. Also, on the half hour, there is a Star Wars character show as well. Coordinate well and you can hit the First Order and then the Character show since they happen in the same place.

7. Speaking of Star Wars crazes…the Jedi Training Academy show is a really cool experience for kids age 5-12. They get to work with a Jedi Master and then fight elements of the dark side (i.e. Kylo Ten and Darth Vader). There are photographers on site to take photos too so you can just watch your kid be in Star Wars heaven. But if this is an experience you really want your kid to have, you need to get to the park as soon as it opens and go right to sign up. The sign up is located over by the Indiana Jones show, just down the way from 50’s Prime-Time Diner. There are quite a few shows, but this is an experience that is in high demand so you’ll want to follow these instructions so your kid can get into the show.

8. The Tower of Terror height restriction is 40″. Please keep in mind that just because your kid is tall enough, doesn’t mean they are ready for this ride. It can be quite scary. And while I’m all for encouraging children to step out of the comfort zone, let’s make sure we’re not scarring them for life.

I hope these tips help you out in your planning! If you have any questions about Hollywood Studios, feel free to comment below!

What to Wear to the Parks – Guys Edition

Hello everyone!

Recently Wendi wrote an awesome post about what to wear when you travel to Disney or any other theme park. It was catered more to women, but I’m here to help out the guys! A lot of the same principles will apply, but guys get the advantage of having deep pockets and usually comfortable shoes. As Wendi mentioned in her post, it’s really nice to go into a park without having to take a bag. That way you can go through security quickly and not have to lug a lot around. I’ll tailor my suggestions to that end. Here are my tips!

#1. Comfortable shoes

When you go to a theme park, you will do a LOT of walking. When I’ve traveled to the parks I often log about 25,000 steps per day. Most guys’ shoes are comfortable already, but maybe avoid things like high tops or other kinds of shoes that could rub against your heal. I usually just wear my running shoes or similarly built sneakers. Like THESE Nike Pegasus Running shoes from Amazon.

#2. Fun shirts!

It’s not required, but walking into the parks with a fun nerd shirt is the best (to clarify, it is required to wear a shirt). I’ve gotten multiple compliments on my pixilated Star Wars shirt or my Zelda: Breath of the Wild shirt. It’s just fun! I also recommend finding some shirts that are made of breathable material, like workout shirts. I have a Spiderman and Captain America shirt with that material and they breathe really well. If you plan to attend a park during the rainy season, you must plan to get wet. These shirts will be super helpful since they dry so easily. If you don’t have any nerdy shirts, get some! Here’s a similar Spider-Man shirt on amazon for only $12.99!

#3. Comfortable shorts

I’ve gone to Disney many times with normal khaki shorts and I’ve loved them, but recently I’ve found something even better. Costco was (is?) selling long Adidas basketball shorts with zipper pockets. These ones on Amazon look similar! They are amazing. I often get really anxious riding a rollercoaster that my phone is gonna fly out of my pockets. Not with these babies! They also breathe well, so Splash Mountain recovery is quick!

#4. Sunglasses/glasses and a microfiber cloth

I often like to wear my glasses into the park so I can see the shows better. I have sunglass attachments that I keep in my pocket. One thing that drives me nuts is going on a rollercoaster and hooking my glasses onto the inside of my shirt, because then it creates smudges all over. That’s why I bring a small microfiber cloth to clean them off afterward. It’s made a lot of difference.

#5. If rainy season, a poncho

Disney sells ponchos in every gift shop in the park, but they cost $10 each. If you can find a small poncho that folds down well, you should be able to slip it into your pocket and “save it for a rainy day.” In Florida it will often pour rain for about 20 minutes or so, then clear up. On other days, it will rain the whole day. I was at work yesterday without my poncho and got to experience the joy of that firsthand. Save yourself some trouble and some money by buying a poncho BEFORE you get into the park.

#6. Sunscreen/hat

If you can sunscreen yourself before entering the park, that is a good idea. I usually don’t bring it into the park myself, but thought it was important to mention it here so y’all don’t get burnt. It’s also handy to try to wear a hat. They don’t take up much space and they usually have bins on the fast rollercoasters so you can store them during the thrills. Make sure you SPF is at least 30! This Neutrogena is one of our favorites!

Those are the items I regularly bring. Pretty simple. That’s the best way to experience the parks, in my opinion. If you bring a backpack, you will get super sweaty from the humidity. Disney has free water at every quick service food location, so you should be able to effectively stay hydrated. If you want to save a few bucks on money, maybe you can pocket a protein bar or two. But I personally love to keep it simple.

I hope this helped! If you have specific cases or questions, please contact us and we’ll help you pack according to your needs. We’d love to hear from you!

Sun Survival Tips for Work or for Play

This post contains affiliate links. When you follow these links I may receive a commission at no additional cost to you. Thank you!

With my new job, I spend a lot of time outside. Like A LOT. Especially since right now I’m only trained to work in the daytime. And while I come from the desert climate of Utah and am well adjusted to heat, Orlando heat and humidity for a 6 or 8 hour shift can be rough.

As an added “bonus” I discovered I have some weird skin conditions that rear their grotesque heads after intense exposure to the sun and heat. When I’ve traveled to Disney or other theme parks, I spend time outside, but I also go inside frequently for attractions, shows and eating. My job has me outside all the time for now. So I didn’t realize until the last couple of weeks how intense these issues were.

But, because of that, I’ve got some really useful tips and product suggestions for surviving work or fun in the sun!

#1- WEAR SUNSCREEN!!!

Whether you are going to be outside playing in the sun or working in the sun, the first thing you want to make sure you have is Sunscreen. SPF 30+ is recommended. Personally, I try to find SPF 50+. And I make sure I have some on me so I can reapply throughout the day. Honestly, the reapplication part is my biggest struggle. I’m going to give you a couple of suggestions for SPF and you can choose what works best for you.
Neutrogena Beach Defense SPF 70 Spray Sunscreen- $8.97 on Amazon
The spray-on option is nice because it makes application pretty easy. Although, you should rub in the sunscreen after you spray it on. For the most part, I really like how this goes on. My only problem is that I developed a weird allergy and needed to switch sunscreens. Which leads me to recommendation #2…
Neutrogena Sensitive Skin SPF 60+- $9.97 on Amazon
If you have skin that is sensitive or prone to eczema, this is a great option! It’s a cream sunscreen. But it helps to lock in the moisture and it’s specially formulated to not cause break outs or rashes. This is my new best friend. I simultaneously discovered that I have a weird stress-triggered eczema AND I am very sensitive to prolonged heat/sun exposure. This product solved my issues. Now I can prevent sunburn and keep my skin sensitivities at bay.

#2- STAY HYDRATED!!!

This is another vital step! When I work, I keep a water bottle clipped to my belt and we are encouraged to drink a bottle of water per hour. Because I am often busy helping guests, I don’t usually get a bottle per hour, but when I go on my breaks I try to make up for it. Also, remember to pre-hydrate before you get to you sunny activities. If you start out as a grape, it will take longer to get to the raisin point. If you’re already mostly raisin, you’re gonna have problems. Drink water on your way to work/fun time. Here are a couple of products that I really like and help me with my hydration needs.
This is my beverage of choice for my lunch break. It tastes great, has only 5 calories per serving and contains natural caffeine for a little extra boost. On my long shifts, it really helps to have the caffeine boost. But I don’t like soda. And frankly, you need to be careful about soda and coffee anyway. They will dehydrate you more quickly. Water is always a first choice, but sometimes you need to switch it up.
nuun electrolyte tablets- $18.04 for 40 tablets on Amazon
My friend introduced these to me and I’m excited to give them a try! They plop right into your water bottle and dissolve to give you subtle flavor and as well as electrolytes. Try them out on your next vacation or even when you’re doing your workouts!

#3- PROTECT YOUR FACE

Your face can definitely take a roasting in the sunshine. And you can’t just use any regular sunscreen on it because they could cause breakouts. So here are some options for your face protection-
Neutrogena UltraSheer Face and Body Stick SPF 70- $8.16 on Amazon
I’ve tried this one and I really like it. It’s like a stick of deodorant that you rub on your face. SPF 70 is fantastic protection too! It glides on easily over or under your make up (or use without make up). 
ELF Beauty Shield SPF 50- $12 at Target
This has kept my face completely protected. I can tell it’s working because if I miss a spot or don’t get close enough to my hairline, I get a little spot of sunburn. It goes on smoothly and SPF 50 on my face without break outs!!!! It’s the dream!
Neutrogena Revitalizing lip Balm SPF 20- $6.29 on Amazon
Don’t forget to protect your lips! Blisters and cold sores on your lips are not fun! This lip balm has several great color options and is so moisturizing AND has SPF 20! I love it. I have one that I keep at home and one that I carry with me while I work so I can reapply! 

#4- ACCESSORIZE!!!

Hats are in! Just ask the Queen of England! But really, if you’re going to spend a lot of time outside, do yourself and favor and get a hat. For work, I’m provided with a wide-brimmed hat. I wear it…sometimes. Honestly, sometimes it kind of feels like it gets in the way. But it does keep my ears from getting sunburned and protects my face and neck as well. I also have a baseball cap that I wear when I know I’m going to spend a day in the sun. And of course, if you’re super sensitive to the sun, consider wearing long sleeved Sun Protection Shirts.
UV/Sun Protection Shirts- $21.99 at Amazon
I am not currently using one of these because I’m afraid I’ll sweat even more and end up dehydrated, but I’ve definitely considered it and if you’re SUPER sun sensitive, please consider it.

#5- AFTER SUN PRODUCTS

Even if you do everything right, you still need to take care of yourself AFTER you’ve spent significant time in the sun. This is something I’ve been spending some time honing these last few weeks. Just like pre-hydration, I need to come home and post-hydrate as well. I usually come home and down a Powerade. My skin also needs some extra TLC after.
BananaBoat After Sun Gel- $13.99 for 2 pack on Amazon
Find a good after sun gel. This isn’t the one I use. I actually use the MaryKay after-sun replenishing gel. It’s a limited edition item and not always available, so I gave you link to a similar product available on Amazon. Even if you only get a little sun, use the gel! If you get sunburned, DEFINITELY use the gel! It keeps things cool and moisturizes your sunburn. It’s saved my life. I’ve definitely been getting sun, but because I’ve been using my after sun gel, I haven’t been peeling!
OZNaturals Vitamin C Mask- $13.49 on Amazon
Vitamin C is vital to sun exposure recovery. This mask has all of the important ingredients to help you skin recover. It’s also mild enough that it can be used daily. It helps my skin rebound after a day in the sun. I definitely see and feel the difference.
Garnier SkinActive Moisture Bomb sheet mask- $14.19 for a 6 pack on Amazon
It’s all about the hydration after sun exposure. Moisturizing sheet masks are great to add a little extra moisture to your face. My face definitely feels softer and happier after I use a moisturizing sheet mask.

Powered by WordPress.com.

Up ↑